
To insert a clickable checkbox in Word, first show the Developer tab: go to File > Options > Customize Ribbon, tick Developer and click OK. Then place your cursor where the checkbox should go and click Developer > Check Box Content Control in the Controls group. Click the box to tick or untick it. For a checklist that will be printed and ticked by hand, use Home > Bullets > Define New Bullet > Symbol and choose an empty box symbol instead.
Checkboxes turn a Word document into a to-do list, a form or a sign-off sheet. There are two kinds, and picking the right one saves time: clickable checkboxes for documents people fill in on screen, and box-shaped bullets for documents that will be printed. This guide covers both, plus how to swap the default X for a tick and how to insert a tick symbol on its own.
What is the difference between a clickable and a printable checkbox?
- Clickable checkbox: a content control that switches between empty and ticked when you click it. Best for forms, checklists and approvals completed on screen.
- Printable checkbox: a box symbol used as a bullet or character. It cannot be clicked, but it prints cleanly and is quick to add to a list.
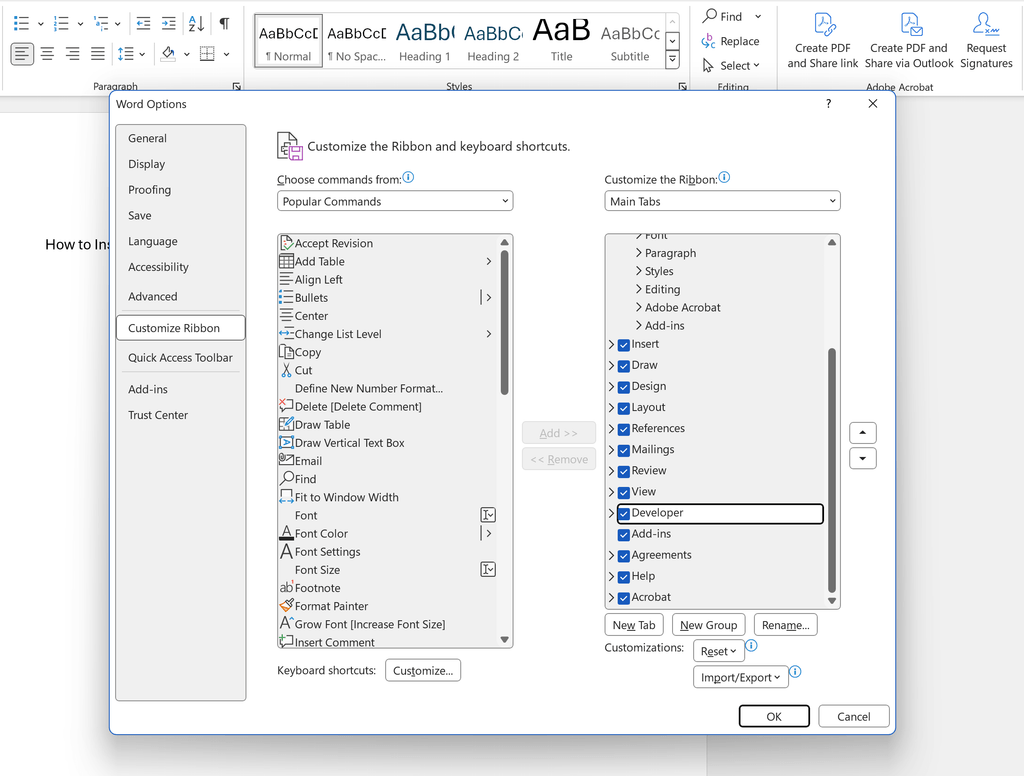
How do you show the Developer tab in Word?
The clickable checkbox lives on the Developer tab, which is hidden by default:
- Go to File > Options > Customize Ribbon.
- In the right-hand list of Main Tabs, tick Developer.
- Click OK. The Developer tab now appears on the ribbon and stays there.
How do you insert a clickable checkbox in Word?
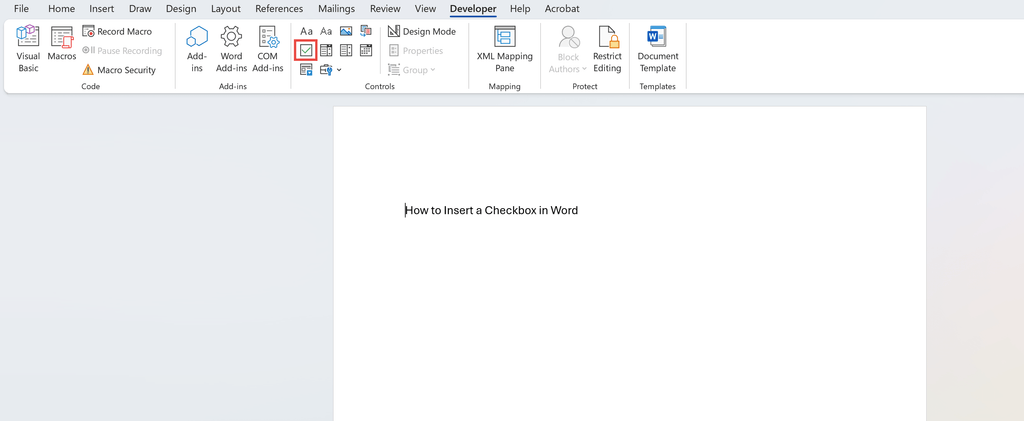
- Click where you want the checkbox.
- Go to Developer > Controls and click Check Box Content Control (the small box with a tick).
- Click the checkbox to tick it; click again to clear it.
To build a list, type your first item after the checkbox, then copy the checkbox (select it and press Ctrl + C) and paste it at the start of each new line. Checkboxes also work inside table cells, which is handy for sign-off sheets.
How do you change the checkbox X to a tick in Word?
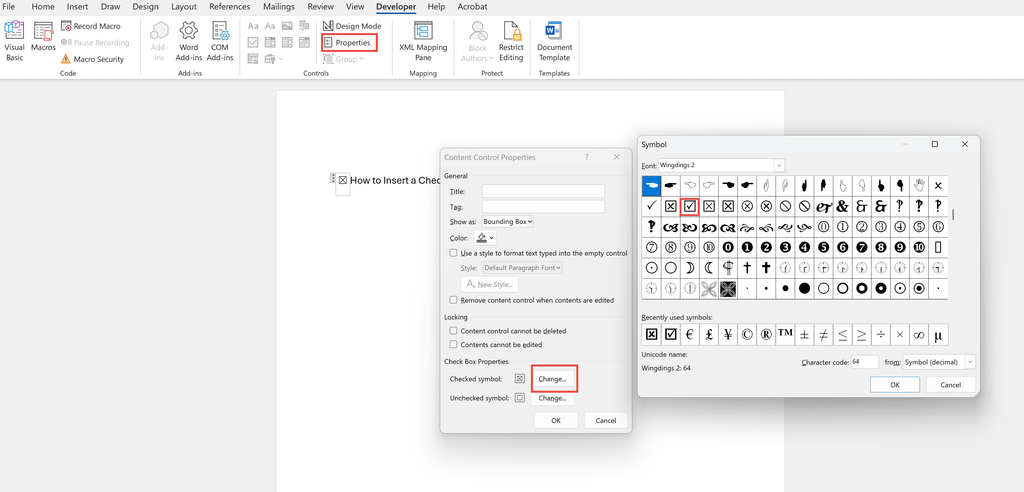
By default a ticked content control shows a crossed box. To show a tick instead:
- Click the checkbox, then click Developer > Properties.
- Next to Checked symbol, click Change.
- Choose a tick: for example, select the Wingdings 2 font and pick the ticked box, or Segoe UI Symbol and pick a check mark.
- Click OK twice.
Repeat for each checkbox, or set up one checkbox the way you like and copy it to the rest of your list.
How do you make a printable checklist in Word?
- Select the lines you want as checklist items.
- Go to Home > Paragraph, click the arrow next to Bullets and choose Define New Bullet.
- Click Symbol, choose the Wingdings font and pick the empty square (character code 168), then click OK twice.
Each line now starts with an empty box, ready to print and tick by hand. The bullet style is saved in the Bullets gallery, so next time it is one click.
How do you insert a tick symbol in Word?
If you just need a tick, not a box, go to Insert > Symbol > More Symbols, choose the Wingdings font and select the tick (character code 252), then click Insert. Word remembers recently used symbols, so the next tick is available straight from Insert > Symbol.
How do you stop people editing anything except the checkboxes?
For a form where people should only tick boxes, go to Developer > Restrict Editing (or Review > Restrict Editing), choose Filling in forms under Editing restrictions, and click Yes, Start Enforcing Protection. Add a password if you want one. Readers can still tick the checkboxes but cannot change the rest of the text.
Practice on your own document
Turn a meeting action list or onboarding checklist into a clickable form: add the Developer tab, insert one checkbox, change its X to a tick, then copy it down your list. For another Word time-saver, see our guide on how to add page numbers in Word.
Forms, content controls and document protection are covered in our Microsoft Word training courses, in-class in Sydney and Melbourne or Online Live across Australia, from Beginner through to Advanced.
Frequently asked questions
Turn on the Developer tab (File > Options > Customise Ribbon > tick Developer), then click Developer > Check Box Content Control where you want the box. For a printed checklist, use Home > Bullets > Define New Bullet and choose a box symbol.
Use the Check Box Content Control on the Developer tab. Place your cursor, click Developer > Controls > Check Box Content Control, and the box can then be ticked and unticked with a click.
Click the checkbox, choose Developer > Properties, and next to Checked symbol click Change. Pick a tick from a font such as Wingdings 2 or Segoe UI Symbol, then click OK twice.
Select your list, click the arrow next to Bullets on the Home tab and choose Define New Bullet. Click Symbol, pick the empty square from the Wingdings font, and click OK twice.
Go to Insert > Symbol > More Symbols, choose the Wingdings font and select the tick (character code 252), then click Insert. Recently used symbols appear straight on the Insert > Symbol menu next time.
It is hidden by default. Go to File > Options > Customize Ribbon, tick Developer in the Main Tabs list and click OK. The tab then stays on the ribbon for every document.
